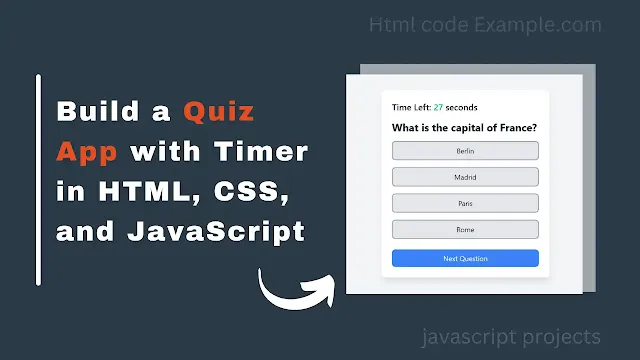
Hey there! So, you want to build a cool Quiz App with a timer? Awesome! Let’s break it down step by step and understand how everything works. I’ll explain it like I’m teaching a friend (because I am!). Here’s the code you’ve shared, and I’ll walk you through it.
What We’re Building
We’re creating a simple Quiz App that:
1. Displays one question at a time.
2. Shows a timer counting down from 30 seconds.
3. Lets the user select an answer and highlights if it’s correct or wrong.
4. Moves to the next question or submits the quiz if it’s the last question.
5. Displays the final score in a beautiful popup.
The Code Breakdown
Let’s go through the code piece by piece.
1. HTML Structure
This is the skeleton of our app. It defines the layout and elements.
<!DOCTYPE html>
<html lang="en">
<head>
    <meta charset="UTF-8">
    <meta name="viewport" content="width=device-width, initial-scale=1.0">
    <title>Quiz App with Timer</title>
    <!-- Tailwind CSS CDN -->
    <script src="https://cdn.tailwindcss.com"></script>
    <!-- Font Awesome CDN (for icons) -->
    <link href="https://cdnjs.cloudflare.com/ajax/libs/font-awesome/5.15.4/css/all.min.css" rel="stylesheet">
    <!-- SweetAlert2 CDN -->
    <script src="https://cdn.jsdelivr.net/npm/sweetalert2@11"></script>
</head>
<body class="bg-gray-100 font-sans flex justify-center items-center h-screen">
    <div class="bg-white p-6 rounded-lg shadow-lg w-96">
        <div id="timer" class="text-xl font-semibold text-gray-800 mb-4">Time Left: <span id="time" class="text-green-500">30</span> seconds</div>
        <div id="question-container" class="mb-6">
            <h2 id="question" class="text-2xl font-bold text-gray-800 mb-4"></h2>
            <div id="options" class="space-y-4"></div>
        </div>
        <button id="next-btn" onclick="nextQuestion()" class="w-full bg-blue-500 text-white py-2 rounded-lg hover:bg-blue-600 transition duration-200">Next Question</button>
        <button id="submit-btn" onclick="submitQuiz()" class="w-full bg-green-500 text-white py-2 rounded-lg hover:bg-green-600 transition duration-200 hidden">Submit Quiz</button>
    </div>
    <script>
        // JavaScript code goes here
    </script>
</body>
</html>
Key Points:
- Tailwind CSS: We’re using Tailwind for styling. It’s a utility-first CSS framework that makes styling super easy.
- Font Awesome: For icons like checkmarks and crosses.
- SweetAlert2: For displaying a beautiful popup with the final score.
- Structure: A
timerdiv to show the countdown, aquestion-containerto display the question and options, and two buttons:Next QuestionandSubmit Quiz.
2. JavaScript Logic
This is the brain of our app. It handles the quiz logic, timer, and interactions.
const questions = [
    {
        question: "What is the capital of France?",
        options: ["Berlin", "Madrid", "Paris", "Rome"],
        answer: "Paris"
    },
    {
        question: "Which planet is known as the Red Planet?",
        options: ["Earth", "Mars", "Jupiter", "Venus"],
        answer: "Mars"
    },
    {
        question: "What is 2 + 2?",
        options: ["3", "4", "5", "6"],
        answer: "4"
    }
];

let currentQuestionIndex = 0;
let score = 0;
let timer;
let timeLeft = 30;
Key Points:
questionsArray: Stores all the questions, options, and correct answers.- Variables:
currentQuestionIndextracks the current question.
-
score: keeps track of the user’s score -
timer: stores the timer interval -
timeLeft: tracks the remaining time (30 seconds).
3. Timer Function
This function starts the countdown.
function startTimer() {
    timer = setInterval(function() {
        timeLeft;
        document.getElementById('time').textContent = timeLeft;

        if (timeLeft <= 0) {
            clearInterval(timer);
        }
    }, 1000);
}
Key Points:
setInterval: Runs every second (1000ms) and decreasestimeLeft.clearInterval: Stops the timer when time runs out.
4. Load Question
This function displays the current question and options.
function loadQuestion() {
    const currentQuestion = questions[currentQuestionIndex];
    document.getElementById('question').textContent = currentQuestion.question;
    const optionsContainer = document.getElementById('options');
    optionsContainer.innerHTML = '';

    currentQuestion.options.forEach((option, index) => {
        const button = document.createElement('button');
        button.textContent = option;
        button.classList.add("wfull", "bggray200", "border2", "bordergray400", "textgray800", "py2", "roundedlg", "hover:bggray300", "transition", "duration200", "relative");
        button.onclick = () => checkAnswer(option, button);
        optionsContainer.appendChild(button);
    });

    // Hide Next button and show Submit button if it's the last question
    const nextButton = document.getElementById('nextbtn');
    const submitButton = document.getElementById('submitbtn');
    if (currentQuestionIndex === questions.length  1) {
        nextButton.classList.add('hidden');
        submitButton.classList.remove('hidden');
    } else {
        nextButton.classList.remove('hidden');
        submitButton.classList.add('hidden');
    }
}
Key Points:
currentQuestion: Gets the current question from thequestionsarray.optionsContainer: Clears previous options and adds new ones.- Button Creation: Creates a button for each option and assigns an
onclickevent to check the answer. - Next/Submit Button: Switches between "Next Question" and "Submit Quiz" based on the current question.
5. Check Answer
This function checks if the selected answer is correct.
function checkAnswer(selectedOption, buttonElement) {
    const correctAnswer = questions[currentQuestionIndex].answer;
    const allButtons = document.querySelectorAll('options button');

    // Disable further button clicks
    allButtons.forEach(button => button.disabled = true);

    if (selectedOption === correctAnswer) {
        buttonElement.classList.add("bordergreen500", "bggreen100", "textgreen800");
        buttonElement.innerHTML += `<span class="absolute top2 right2 textgreen500"><i class="fas facheckcircle"></i></span>`;
        score++;
    } else {
        buttonElement.classList.add("borderred500", "bgred100", "textred800");
        buttonElement.innerHTML += `<span class="absolute top2 right2 textred500"><i class="fas fatimescircle"></i></span>`;

        // Highlight the correct answer
        const correctButton = [...allButtons].find(button => button.textContent === correctAnswer);
        correctButton.classList.add("bordergreen500", "bggreen100", "textgreen800");
        correctButton.innerHTML += `<span class="absolute top2 right2 textgreen500"><i class="fas facheckcircle"></i></span>`;
    }
}
Key Points:
- Disable Buttons: Prevents the user from changing their answer.
- Correct Answer: Highlights the selected answer in green and adds a checkmark.
- Wrong Answer: Highlights the selected answer in red and shows the correct answer.
6. Next Question
This function moves to the next question.
function nextQuestion() {
    currentQuestionIndex++;
    if (currentQuestionIndex < questions.length) {
        loadQuestion();
        resetTimer();
    }
}
Key Points:
- Increment Index: Moves to the next question.
- Reset Timer: Resets the timer to 30 seconds.
7. Submit Quiz
This function shows the final score.
function submitQuiz() {
    clearInterval(timer);

    // Use SweetAlert to show the final score in a beautiful modal
    Swal.fire({
        title: 'Quiz Completed!',
        text: `Your final score is ${score} out of ${questions.length}`,
        icon: 'success',
        confirmButtonText: 'Ok',
        background: 'f9f9f9',
        color: '333',
        confirmButtonColor: '3085d6',
    });
}
Key Points:
- SweetAlert2: Displays a popup with the final score.
8. Reset Timer
This function resets the timer.
function resetTimer() {
    clearInterval(timer);
    timeLeft = 30;
    document.getElementById('time').textContent = timeLeft;
    startTimer();
}
How It All Works Together
- The app starts by loading the first question and starting the timer.
- The user selects an answer, and the app checks if it’s correct.
- The app moves to the next question or submits the quiz if it’s the last question.
- The final score is displayed in a popup.
Final Thoughts
And that’s it! You’ve built a fully functional Quiz App with a timer. You can expand this by adding more questions, a leaderboard, or even a high-score system. Keep coding, and have fun!


